
Starting a new build is thrilling, but it can quickly stall if your block of land isn’t prepped properly. When it comes to Site & Home Pad Preparation, I know the feeling you’re eager to pour the slab, put up walls and pop the cork on the champagne. But hold your horses: getting the Site & Home Pad Preparation just right is the foundation of success (literally).
From clearing trees to grading dirt, these pre-construction steps set the stage for a smooth project. In this guide, I’ll walk you through every stage of Site & Home Pad Preparation for your Wide Bay home, mixing expert tips with a conversational, Aussie‐style flair.
Picture your site now: maybe it’s overgrown with grass, maybe uneven and a little wild. Before diving in, imagine it transformed level, clear, and ready as a ballroom floor for your new house. That’s what Site & Home Pad Preparation achieves.
We start by cleaning the slate: removing debris, vegetation, and obstacles that could wreck your concrete or foundation later. This means cutting down overhanging trees, pulling stumps, and grading away bumps. It’s a bit like prepping a dance floor you want zero tripping hazards before the party starts.
By the end of this step, you’ll have ground that’s free of shrubs, old foundations or pipes, and old pavers. This clean base makes the next steps (like levelling and compacting) a breeze.
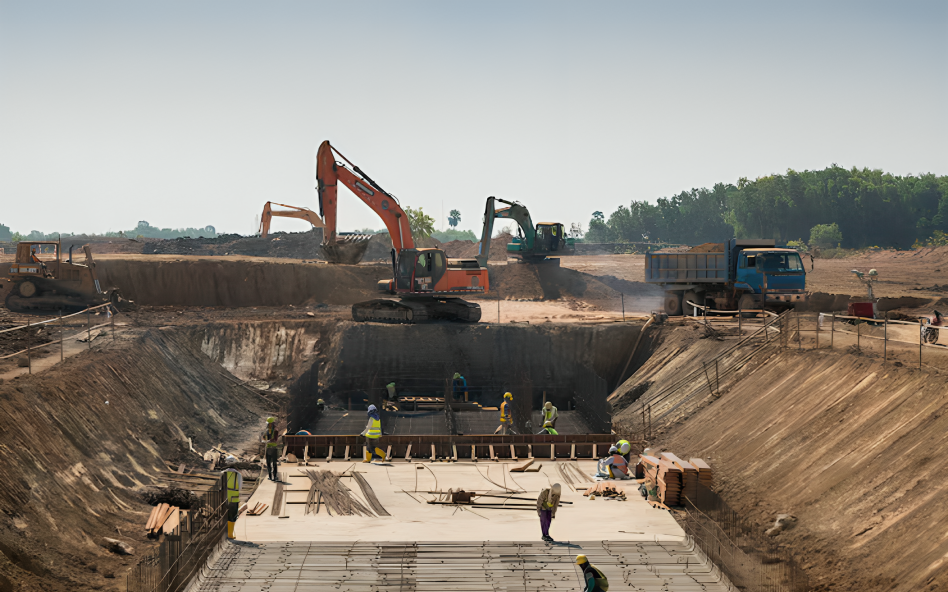
By the third paragraph, you may already be itching to break ground, and for good reason. A job this important often calls for a pro’s touch. That’s why locals across Wide Bay trust the Best Site & Home Pad Preparation Service in the Wide Bay area to handle the heavy lifting literally.
Companies like Outback Digger Hire (a top crew I’ve worked with) specialise in residential earthworks right here in Bundaberg, Hervey Bay, Maryborough and beyond. Their experienced operators know the lay of the land and have the right gear to clear, dig, and grade with precision.
Think of these folks as the ultimate pit crew for your build: they get your block trimmed, levelled and compacted so your contractor can pour slab without a hitch.
Why Site & Home Pad Preparation Matters
You might wonder, “Why go through all this hassle before building?” Fair question. The truth is, sloppy site prep can haunt a home for years. A pad that’s out of level invites drainage drama, water pooling by the walls or sliding under the slab during a big rain.
Tree roots left behind can heave the concrete. Uneven fills can settle later, leading to cracks or sloping floors. Imagine finding out your brand-new tile floor isn’t level after final finishes… that’s a headache nobody wants. Proper preparation avoids these nightmares.
In Wide Bay’s subtropical climate, this is even more critical. We get around 1,000mm (1 metre) of rain a year, much of it in the summer months. Storms can dump a sudden deluge, so it pays to put drainage channels and landfall slopes in place during prep.
Also, much of our region sits on clayey soil that can swell and shrink with moisture changes. Preparing the pad means we account for all that movement up front. It’s like giving your house a bit of insurance ensuring it sits on firm, stable ground no matter what Mother Nature dishes out.
Understanding Wide Bay’s Soil & Climate
Being locals, we know Wide Bay’s dirt is far from uniform. Up near Bargara, soils might be sandier. Around Gin Gin or the sugar cane fields, it’s heavier clay. I’ve seen street to street differences in how the ground behaves after rain.
Here’s the gist: reactive clay soils (think Bundaberg’s inland areas) soak up water, puff up, then dry out and contract. Without the right prep, your slab could crack or rock on these soils. On the other hand, loose sandy patches (common on coastal blocks) drain well but might lack support. That’s why we often bring in extra fill and do hardcore compaction.
Because of this variety, it’s best practice to get a geotechnical test. I’m talking about drilling bores or digging test pits. These guys analyze your soil profile and classify it (per AS 2870) from Class A (good sturdy sand/rock) up to Class E (seriously reactive clay).
It sounds technical, but the takeaway is simple: know what’s underfoot. Armed with that info, builders design the right slab type and know if extra prep (like stabilising additives or thicker footings) is needed. Always ask your builder or engineer about this before pouring concrete. It can save a fortune in future repairs.
Clearing & Leveling Your Site
First things first: clear the block. This means trimming or removing trees, bush, and shrubs that lie in the footprint of your future home or shed. Don’t forget hidden roots. I’ve heard of a case where a rogue root cracked a brand new driveway because it wasn’t removed early on. We also haul away old slabs, fences or junk. A tidy site is the sign of a tidy mind, right?
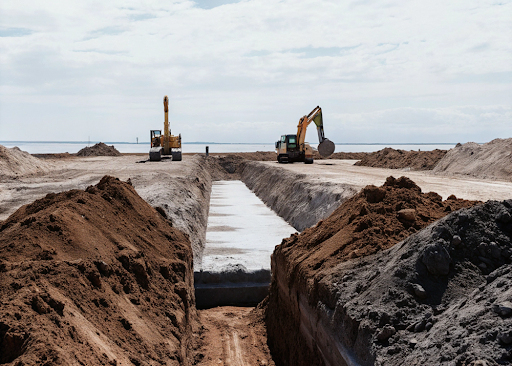
Next up, we level and grade the land. This is a game-changer. The goal is to create a gentle slope away from where your house will sit, usually around 10mm to 20mm drop per metre.
Why? So that rainwater naturally rolls away from your walls and into your drains or garden. Without it, imagine a rainstorm puddling up against the concrete foundations.
The crew will use laser levels and bulldozers or excavators to cut high spots and fill low spots until the pad is flat enough for the slab. Sometimes it’s a matter of cut and fill: dirt from where it’s too high is moved to where it’s too low, evening out bumps. On very sloping blocks, they might do a split-level pad or terraces.
It looks something like this:
- Remove vegetation & debris: Kill or remove unwanted plants. Grind out stumps if needed. Haul away any rubble or old concrete.
- Rough grading: Use machinery (excavator, bobcat) to start shaping the site’s general levels. Make sure the future house pad is slightly raised above the highest peak of storm water, often by filling and compacting if needed.
- Finish grading: Fine-tune with a laser level or grader blade so the entire pad is even. Check with a long straight board or string line along the high and low points to confirm the correct slope.
At this stage, the site starts looking like a construction zone in earnest. It’s also a good time to plan your stormwater pipework or drains. In Wide Bay, even small rains can make big puddles, so you want to install any gutter offshoots or French drains now – before the slab goes in.
Drainage & Water Management
One of the golden rules in site prep is “control the water.” Think of your home as a boat on a mooring: you wouldn’t anchor it in a flood! After grading, we usually dig a trench or two for stormwater, a swale or drain line that leads rain off to a legal drainage point (road, creek, etc.). Your builder or council will specify where water should go.
On smaller blocks, even sloping the pad well can handle a lot. But on large or flat ones, you might need a dedicated pit or a gravel-filled trench. Contractors also use compacting machinery to firm up the soil AFTER grading.
Why? Because freshly moved dirt can be loose. They’ll run a heavy plate compactor or roller across the pad in layers, locking the ground together. This stops it settling or washing away in the next rain.
If you skip proper drainage, you’ll curse every storm cloud above your head. I once saw a slab project halted because the contractors forgot to slope the pad; every shower left a mini lake at the back door. Don’t let that happen – get the water where you want it now, not later.
Soil Testing & Compaction
We touched on soil testing earlier, but it deserves its own moment. Testing the soil usually via a geotech report tells you exactly how that dirt is classified and what to do about it.
If tests show you’ve got Class M or H soils (moderately to highly reactive clays), your builder might design a raft slab or include more steel. If the site is mostly Class A or S (sand or slightly reactive), you have more leeway with standard slabs.
After testing and any recommended work, we compact the soil. This cannot be overstated. Loose or uncompacted fills will settle under the weight of your house, leading to cracking later. The crew will add fill dirt (usually a mix of sand, clay and gravel) in thin layers (like 100mm lifts) and compact each layer thoroughly.
They might even do moisture checks – making sure the dirt is neither too wet nor too dry as they pack it down. Think of it like making a firm foundation in cake layers; each layer is squished until rock-solid before you move to the next.
In Australia, building codes refer to these efforts: under the National Construction Code (NCC) and AS 2870 standards, your site is put into a category and specific compaction standards apply. Most domestic sites end up as Class A, S or M. If you haven’t had soils tested by a professional, the code assumes the worst (usually reactive) and forces extra caution. Bottom line: better to know your soil’s story.
Compliance & Working with Professionals
Building a house is not a solo DIY you’ll need to deal with paperwork and approvals too. Depending on your council (Bundaberg, Fraser Coast, Gympie or others in Wide Bay Burnett), you typically need a building approval before even starting earthworks.
This often involves providing a site plan that shows your proposed work, including any retaining walls, drainage plans, or tree removals. If your land is near flood-prone areas, you might have to raise the pad to the required flood level, something to check early on.
Don’t forget environmental rules: in Queensland, guidelines require sediment and erosion control on building sites to protect creeks and the reef. This means we may need silt fences, mulch or straw bales during construction so all that loose soil doesn’t wash into storm drains. It may seem like overkill for a little house, but those rules are there for a reason we love our waterways here.
Hiring licensed professionals is key. A surveyor will set your boundaries and floor levels. A licenced excavator operator (often hired through builders or firms like Outback Digger) handles the digging and compacting.
And if things look tricky say you hit a buried rock shelf or unexpected water call in an engineer. Remember: you’re building your future home, not digging a backyard pool, so it’s worth it to get experts on your team.
Conclusion
By now you should see that Site & Home Pad Preparation is a bit like laying good foundations in all senses. You’re investing a little time, money and elbow grease up front to avoid major headaches down the line. Throughout Wide Bay, the best builds are the ones that took care of this stage.
If you’ve got a new block or an addition planned, don’t skip the prep party. Double-check your permit requirements, call in a reliable earthworks crew, and stay involved as the pad takes shape. It’s a wonderful feeling to walk on that smooth, level ground and think: “This baby is ready.”
Ready to get started? Give your future home the solid start it deserves. Talk to your builder or an excavation specialist today to map out your site prep plan. A flat, stable pad is not just the law of the land – it’s the law of great building.
Frequently Asked Questions
Q: What exactly is Site & Home Pad Preparation?
A: It’s the process of making your land ready for construction, including clearing, leveling, soil compaction, and drainage setup. These steps create a stable and dry base for building. Proper preparation helps prevent future structural issues.
Q: Why can’t I just start digging without all this prep?
A: Skipping prep can lead to uneven settling, cracks, and water pooling around your foundation. Proper Site & Home Pad Preparation ensures the ground is stable and drainage is managed. It reduces costly problems later.
Q: How long does site preparation usually take?
A: It depends on site size and conditions, ranging from 1–2 days for small flat blocks to a week or more for complex sites. Weather can also affect timelines. Dry seasons usually allow faster progress.
Q: Do I need special permits for site prep?
A: Yes, most projects require building approval, which often includes site work. Additional reports or plans may be needed depending on soil conditions. Always check with your local council or certifier.
Q: Can I do my own Site & Home Pad Preparation?
A: Small tasks may be DIY if you have experience and equipment. However, hiring professionals ensures proper levels, compaction, and compliance. It also saves time and reduces risks.
Q: How much does site & home pad preparation cost?
A: Costs vary based on clearing, soil type, access, and site complexity. Simple jobs may cost a few thousand dollars, while larger or difficult sites cost more. Getting a detailed quote is recommended.
Q: When should Site & Home Pad Preparation happen in the build timeline?
A: It’s one of the first steps after plan approval. The site must be fully prepared before laying the foundation or slab. This ensures a smooth construction process.